Have you had your fill of those same old Christmas cookies? You know, the ones with the reindeer and snowflakes? It's high time to switch things up with something special - these super cool Christmas picture cookies!
It doesn't matter if you're a seasoned baker or someone who loves the ease of store-bought treats - You can use either.
The exciting part begins when you pick your designs and have your edible wafer paper delivered to your doorstep. Just add a smooth layer of royal icing, attach your designs, and see how even the simplest cookie becomes a beautiful work of art.
These fancy Christmas cookies don't just make awesome gifts, they can even bring some extra festive flair as hanging decorations for your Christmas tree.
Feeling a bit unsure about where to start? No worries. We'll give you the lowdown on where to find awesome images for inspiration, where to score those fantastic printed wafer paper sheets and walk you through every step of the process.
Best of all, even if you're not a cookie Picasso, you'll find this whole experience to be not just fun but also surprisingly easy.

Jump to:
What's to love about this recipe
- Design your cookies as unique as you are.
- Suitable for both novice and seasoned bakers.
- Choose between homemade or store-bought cookies.
- Thanks to edible wafer paper, decorating is a breeze.
- These cookies make thoughtful gifts.
- Hang them on your Christmas tree for extra festive charm.
Key ingredient notes and substitutions
**Please see the recipe card at the bottom of this post for the full list of ingredients.

The cookies
Using homemade cookies:
- Choose a plain cookie recipe without add-ins like chocolate chips to ensure a smooth and even surface.
- Select a cookie recipe that doesn't spread excessively during baking. To achieve this, avoid making cookies that are too thick and, most importantly, let the cookie dough chill and firm up in the fridge before baking. The longer the better, this prevents excessive spreading in the oven.
- If you still end up with cookies that have a slight 'dome' on top, don't worry. Simply turn them over and attach the icing and edible paper to the flat bottom.
- If your plan is to use these cookies as Christmas tree decorations, remember to create a small hole through the cookies before baking them. A thin straw is a handy tool for this purpose.
We have some recipes that work well for this technique, provided you chill the cut-out cookies before baking:
- For a plain cookie, try this sugar cookie recipe.
- For a chocolate cookie, try these chocolate shortbreads.
- For a cookie filled with warm spices, try these spice cookies, perfect for Christmas flavours.
Using shop-bought cookies:
- Choose a plain cookie without add-ins like chocolate chips to ensure a smooth and even surface. Cookies like Digestive biscuits (Graham crackers) work well.
- Select cookies with minimal embossing on top. If the embossed design is shallow, you can fill it with royal icing, but this may not work for deeply embossed lines.
As an alternative, rather than using royal icing to cover the store-bought cookie, you can cut out a piece of fondant icing as a smooth base for the wafer paper. Simply adhere the fondant icing to the cookie using a touch of jam, or, if you're in the US, corn syrup.
- Please note that store-bought cookies may not be suitable for hanging as tree decorations since they would require a hole to be punched into the cookie before baking, which is typically not possible with pre-made cookies.
The icing layer
Option 1: Royal icing
In our approach, we use royal icing (guide below) to coat the cookies before applying the edible wafer paper design, and here's why:
- Smooth canvas: Royal icing creates a flawless surface for the wafer paper to stick to, ensuring no unsightly lumps or bumps. Since wafer paper is exceptionally thin, any textural irregularities on the cookie would be visible without that layer of smooth icing.
- Colour brilliance: Pure white royal icing allows the colours in your design to truly pop. Think of it like placing a colourful picture on a lightbox, the colours come across as vivid and vibrant.
- Professional finish: A delicate white border around your design serves as a nice frame, giving your cookie a polished and professional appearance.
Option 2: Fondant icing
Yet, there's another option besides royal icing and that's fondant icing. You can easily find ready-made packs in most supermarkets. Just roll it out thinly and cut it into the same shape as your cookies.
Then, attach the fondant piece to your cookie using a touch of jam, corn syrup or even water.
To complete the process, place your edible wafer paper design on top by lightly brushing the fondant piece with a bit of water and then attaching your design. It's a straightforward and effective method.
Edible wafer paper
Edible wafer paper might seem like ordinary paper but in fact, it's a special material made from potato starch, vegetable oil and water. They're usually vegetarian and vegan-friendly as well as dairy and gluten-free.
It practically melts on the tongue, is pretty much tasteless and keeps for a really long time. It's a breeze to cut with scissors and water is all you need to make it stick to a surface.
You can also print cool designs on it using edible ink. There is a vast array of shops that will print your custom designs onto edible paper for you.
Here is a handful of options (we are not affiliated with any of them):
- CakeyBake - United Kingdom (we use them, they're fast and friendly)
- Ink4Cakes - USA
- Bee Box Design Studio - USA
- Custom Icing - Australia
- Edible Images Canada - Canada
- Crystal Candy - South Africa
- Kiwi Cakes - New Zealand
Numerous other websites are available, so be sure to explore local shops in your area or consider alternatives that may provide more cost-effective choices.
Ideas and resources for graphics you can use
The possibilities are endless!
- Your own artwork: Express your creativity by using your original artwork.
- Life stages montage: Use photos of a loved one from birth to the present, creating a series of cookies that represent different stages in their life. Perfect for milestone birthdays like the 80th, 90th, or 100th.
- Pop culture icons: Consider favourite sports logos, superheroes or Disney princesses.
- Anniversary memories: Use wedding photos to celebrate an anniversary in a unique way.
- Vintage charm: Explore vintage images from old Christmas cards, stamps, magazine cuttings and advertisements for a touch of nostalgia.
- Musical inspiration: Pay homage to a favourite artist, musician or band.
- Poetic touch: Feature parts of a cherished poem as a central design.
- Harmonious melodies: Incorporate a piece of sheet music into your cookie designs.
- Florals: Decorate with intricate floral patterns.
- Geometric patterns: Experiment with geometric and abstract designs.
- Humour and wit: Add a touch of humour with jokes and clever one-liners, perhaps things someone is known for always saying.
- Inspirational quotes: Use inspirational quotes to uplift and inspire.
- Spiritual symbols: Explore religious motifs for a meaningful touch.
Free graphics:
Just remember, if you plan to use any graphics for commercial purposes, always review the site's terms and conditions to ensure compliance with their usage policies.
- The Graphics Fairy (our personal favourite and the source of the images used for the cookies featured in this post.)
A note on making the royal icing
Please take note that this process consists of two steps, using the same batch of icing:
- The first batch of icing will be somewhat thick and we'll use it to create the outlines on the cookies. These outlines are necessary to keep the thinner icing, which we'll use later to "flood" the cookies, inside.
- Now, with the remaining icing, we'll adjust its consistency for flooding by adding a bit of water. This thinner icing will flow smoothly to fill the outlined areas on the cookies.
You will need two clean piping bags and a small, round tip for this process.
It's also really important that you allow the royal icing to dry and harden fully before adding the wafer paper designs.
How to make these cookies - Step-by-step guide:
Making the royal icing - Piping the outlines

- Sift the icing sugar into a medium bowl.

- Add the egg white to the icing.

- Use a fork to mix the icing sugar and egg white together, preventing a cloud of sugar when you start using the electric mixer.

- With an electric hand mixer, beat the mixture until it's smooth and free of lumps.

- Check the consistency: It should resemble a thick paste that holds its shape.
If it seems too runny, add a touch more icing sugar. For a thicker consistency, introduce a small drop of water.
Typically, there's little need for adjustments at this stage, unless you've used an unusually small or large egg white.
This initial icing is for outlining the cookies, which will contain the thinner icing used later to fill them in.

- Place about a fifth of the icing into a piping bag with a small, round tip.

- Gently pipe an outline around each cookie, creating what will be your "flood line."
Making the royal icing - Flooding inside the lines

- Revisit the remaining icing. Begin by adding no more than a teaspoon of water to it and stir thoroughly.
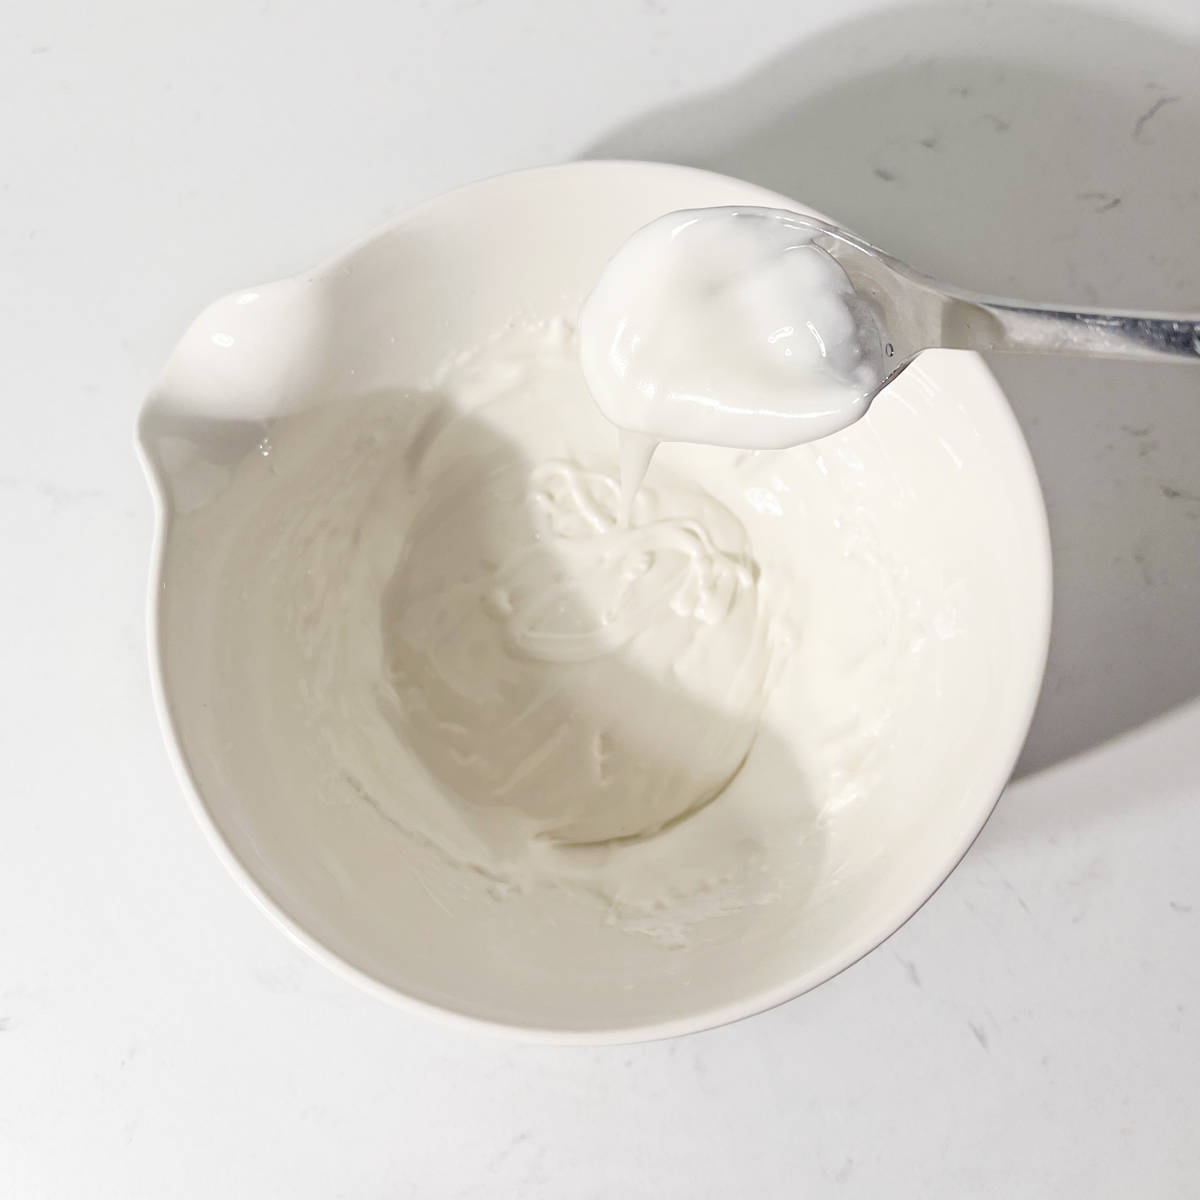
- Check the consistency: It should be slightly runnier than before, but not too thin.
Perform this test: Take a spoonful of icing and drizzle it back and forth over the icing in the bowl. Start counting.
If the "ribbon" takes around 10 seconds to disappear, the icing is at the right consistency.
If it takes much longer, add a drop of water. Mix and test again. If it disappears in less than 10 seconds, incorporate a small amount of icing sugar to thicken it up. Mix and test again.
- Load a new piping bag with the flooding consistency icing using the same piping tip, or go for a slightly larger one if you prefer.

- Within the outlined area of the cookie, pipe zig-zag lines. Avoid overfilling this space by leaving gaps between the lines.

- With the tip of the piping tip, gently nudge the icing into the gaps without squeezing the bag to release more icing. Carefully push the icing around until you achieve a consistent, even layer of icing between the outlines. You can use a toothpick for this step too.
It's important to work swiftly and not step away from the cookie during this phase. If you delay, the icing may dry, making it impossible to adjust and fill the gaps.

- Repeat this step for all your cookies. Allow them to dry for 24 hours or at a minimum for 12 hours. They should be fully dried, quite firm and have a smooth, shiny surface.
Attaching the wafer paper to the cookies

- Measure the specific area on the cookie where you intend to place the wafer paper design. Then, cut out the corresponding shapes from the wafer paper.
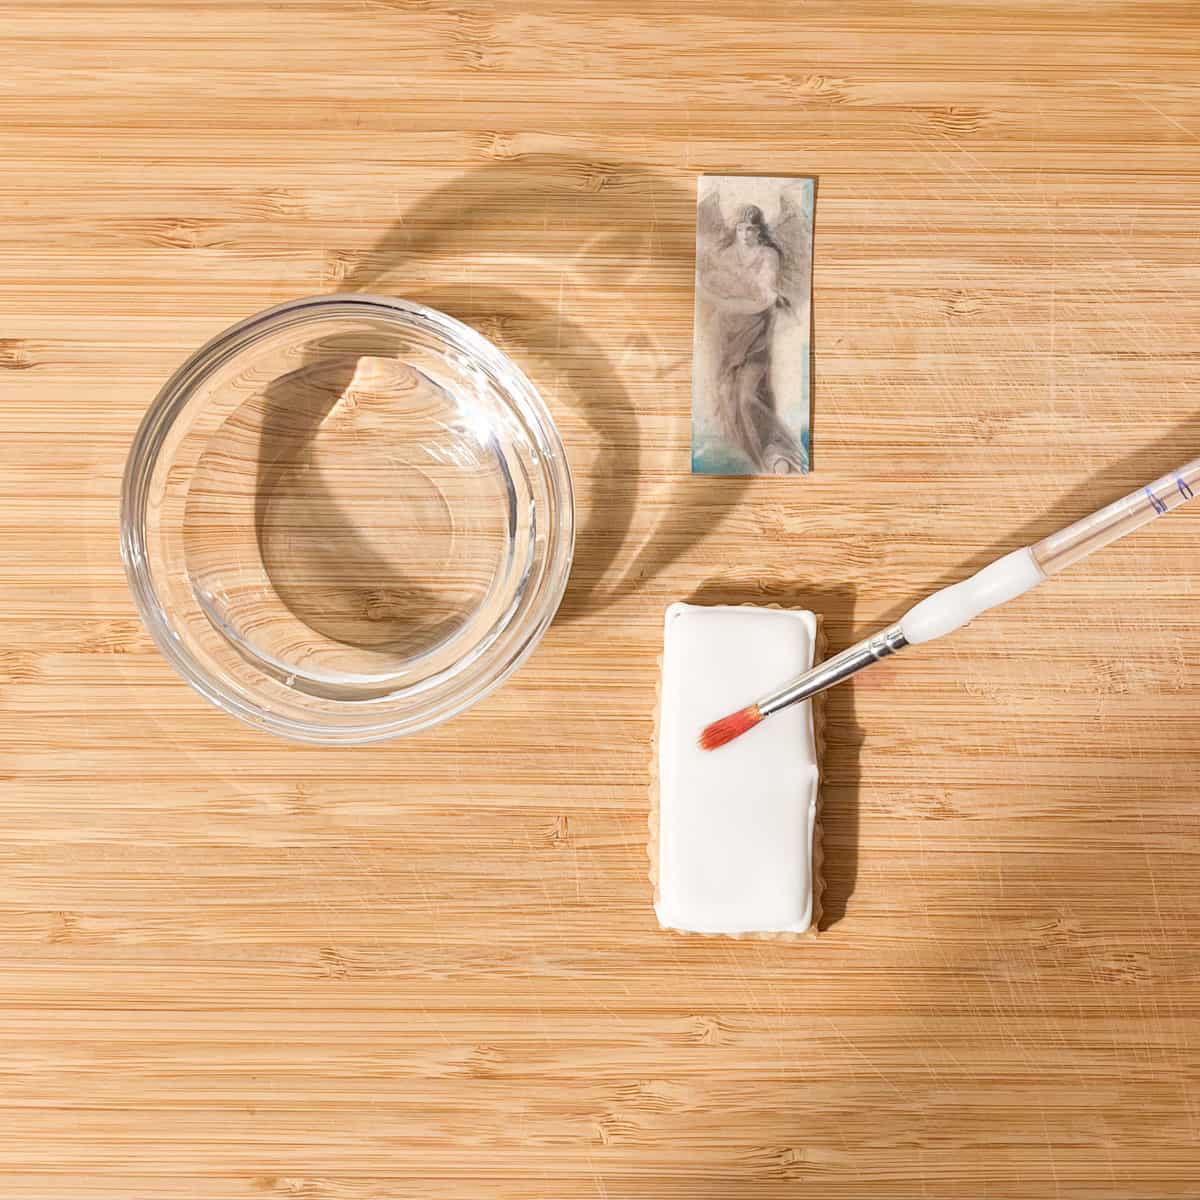
- Using a small, clean brush, gently apply a thin layer of water onto the surface of the hardened icing.
Don't do it the other around by brushing the wafer paper instead. It will become soggy or dissolve before you have a chance to adhere it to the cookie.

- Delicately position your design onto the moistened surface of the cookie and press it down. If you notice any areas, such as corners or sides, lifting up, simply brush a small amount of water under or onto the wafer paper and secure it in place.
- Leave your little works of art to fully dry before handling them.
Gifting
Let's be honest, these cookies are fantastic gifts! However, whipping up a large batch for multiple recipients can be a challenge - unless, of course, you have the time and resources.
As an alternative, consider grouping a batch of plain cookies together and placing just one picture cookie on top. Then, secure them together using a piece of string or a ribbon.

You can also put these cookies to excellent use as homemade Advent calendar gifts, featuring a different picture for each day.
Storage
Store the cookies in an airtight container, ensuring it's sealed well to prevent air exposure. This helps maintain the freshness and prevents the wafer paper from becoming too soft. The cookies will keep well for up to 3 months.
To prevent the cookies from sticking together or transferring moisture, you can place parchment paper or wax paper between the layers of cookies.
Keep the cookies in a cool, dry location away from direct sunlight and heat sources. This will help preserve their quality and prevent the wafer paper from melting.
Wafer paper can become sticky and dissolve in humid conditions. If you're in a humid climate, consider adding a food-safe desiccant packet to the container to absorb excess moisture.
Wafer paper cookies are not suitable for freezing.
Recipe

Christmas Cookies with Edible Wafer Paper (Photo Cookies)
Equipment
- 1 small brush
- 1 small bowl with water
- printed, edible wafter paper sheets
Ingredients
- 12 cookies - homemade or shop-bought
- 225 grams icing sugar - aka powdered sugar
- 1 egg white
- 1-2 teaspoons water
Instructions
**We suggest you read the blog post first since it has visuals that can make the steps below easier to understand.**
Making the royal icing - Piping the outlines
- Sift the icing sugar into a medium bowl.225 grams icing sugar
- Add the egg white to the icing.1 egg white
- Use a fork to mix the icing sugar and egg white together. This step is to prevent a cloud of sugar when you start using the electric mixer.
- With an electric hand mixer, beat the mixture until it's smooth and free of lumps.
- Check the consistency: It should resemble a thick paste that holds its shape. If it seems too runny, add a touch more icing sugar. For a thicker consistency, introduce a small drop of water. Typically, there's little need for adjustments at this stage, unless you've used an unusually small or large egg white.
- Place about a fifth of the icing into a piping bag with a small, round tip.
- Gently pipe an outline around each cookie, creating what will be your "flood line."12 cookies
Making the royal icing - Flooding inside the lines
- Revisit the remaining icing. Begin by adding no more than a teaspoon of water to it and stir thoroughly.1-2 teaspoons water
- Check the consistency: It should be slightly runnier than before, but not too thin. Perform this test: Take a spoonful of icing and drizzle it back and forth over the icing in the bowl. Start counting. If the "ribbon" takes around 10 seconds to disappear, the icing is at the right consistency. If it takes much longer, add a drop of water. Mix and test again. If it disappears in less than 10 seconds, incorporate a small amount of icing sugar to thicken it up again. Mix and test again.
- Load a new piping bag with the flooding consistency icing using the same piping tip, or go for a slightly larger one if you prefer.
- Within the outlined area of the cookie, pipe zig-zag lines. Avoid overfilling this space by leaving gaps between the lines.
- With the tip of the piping tip, gently nudge the icing into the gaps without squeezing the bag to release more icing. Carefully push the icing around until you achieve a consistent, even layer of icing between the outlines. You can also use a toothpick for this step.It's important to work swiftly and not step away from the cookie during this phase. If you delay, the icing may dry, making it impossible to adjust and fill the gaps.
- Repeat this step for all your cookies. Allow them to dry for 24 hours, at a minimum for 12 hours. They should be fully dried, quite firm and have a smooth, shiny surface.
Attaching the wafer paper to the cookies
- Measure the specific area on the cookie where you intend to place the wafer paper design. Then, cut out the corresponding shapes from the wafer paper.
- Using a small, clean brush, gently apply a thin layer of water onto the surface of the hardened icing. Don't do it the other around by brushing the wafer paper instead. It will become soggy or dissolve before you have a chance to adhere it to the cookie.
- Delicately position your design onto the moistened surface of the cookie and press it down. If you notice any areas, such as corners or sides, lifting up, simply brush a small amount of water under or onto the wafer paper and secure it in place.
- Leave your little works of art to fully dry before handling them.
**Nutritional data disclaimer**
Please keep in mind that the nutritional information provided below is calculated by a third party and we cannot guarantee the accuracy. We try our best to give you the most accurate information, but we do not take responsibility for errors that may be present. Also, the nutritional value of the recipe may change depending on the exact brands and products used. We recommend that you consult with a qualified healthcare professional or registered dietitian for personalised advice on your dietary needs.
Nutrition
For food safety advice, including guidance on food allergies





Leave a Reply