
Saying it's the best rocky road fudge recipe? Bold claim, right? But hear us out - we have reasons! ⬇️
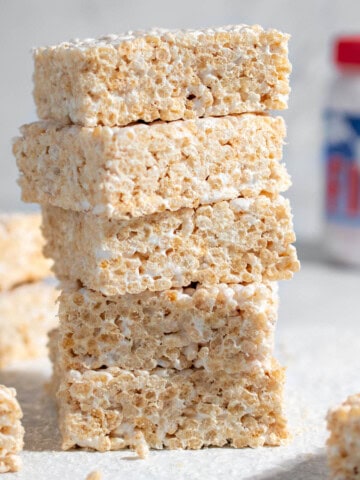
(If you're into no-bake treats like we are, give our easy Rice Krispie squares with marshmallow fluff a try too!)

Jump to:
After extensive testing, we've nailed down three game-changing secrets that make this recipe shine:
- Sliced-up, large marshmallows chunks for a soft, pillowy bite (mini marshies work too, of course, but trust us on this).
- Shortbread fingers - roughly chopped - giving it a beautifully thick, chunky and buttery texture, far better than using a thinner cookie.
And honestly, Scottish shortbread and chocolate? It's a match made in heaven! - And finally, the pièce de résistance: Honeycomb (cinder toffee)-covered chocolate. That crunch! Those specks of gold!
Check out our ingredient tips for some great swaps if you don't have honeycomb chocolate on hand.
Oh, and did we mention? This recipe is laughably easy - even if you've never even lifted a spatula in the kitchen.
For similarly easy, chocolatey bites using condensed milk, be sure to check out our Brigadeiros and Beijnhos recipes too!

Key ingredient notes and substitutions

Milk chocolate
While dark chocolate is an option, it doesn't quite capture the playful, light and fun vibe that homemade rocky road fudge is all about.
Milk chocolate brings that creamy, smooth sweetness that fits perfectly with the carefree, unpretentious nature of these squares.
We usually use a reasonable quality chocolate bar (no need for Lindt!) broken into smaller pieces.
Marshmallows
Using mini marshmallows is the go-to for most rocky road recipes and they're perfect if you're after minimal fuss and want to just throw them in.
But, and we really encourage you to consider this - try using sliced-up, chunky pieces of large marshmallows.
Not only does it look amazing, but biting into a generous chunk of marshmallow is simply heavenly!
Shortbread fingers
There's just something about the combination of chocolate and shortbread that stands out more than any other cookie.
We specifically choose shortbread fingers, like Walker's, because of their shape. When you chop them into rough chunks, you end up with these little squares of cookie that work so well in this rocky road.
If you can't find shortbread fingers, try to use a reasonably chunky shortbread round instead.
Chocolate covered honeycomb (cinder toffee)
This is easily our favourite ingredient of this recipe!
If you're unfamiliar with it, honeycomb is also known as sponge candy, sea foam or hokey pokey, depending on where you're from.
Here's what we typically use in the UK:
- Asda's Chocolate Honeycomb Balls
- Aldi's Dairyfine Milk Chocolate Honeycomb Bites (roughly chopped)
- M&S Milk Chocolate Honeycomb (roughly chopped)
We know that honeycomb-covered chocolate may not be as readily available everywhere, so here are some great alternatives we've found online (though we haven't tried all of them).
Apologies, it's hard to cover ALL the countries):
- Cadbury's Crunchie Bars (widely available)
- Bumbles Milk Choc Honeycomb (AUS)
- Woolworths Chocolate Sharepack Honeycomb Bites (NZ)
- Violet Crumble (US)
If you can't find any of the above, you can also use chopped-up, plain pieces of cinder toffee, sponge candy, sea foam or hokey pokey.
Another option is to use malted chocolate treats, like:
- Maltesers (widely available)
- Whispers (SA)
- Chuckles (SA)
- Whoppers (US)
- Metro's Milk Chocolate Malted Balls (CAN)
And if all else fails, chunky pieces of fudge or soft caramels work just as well!
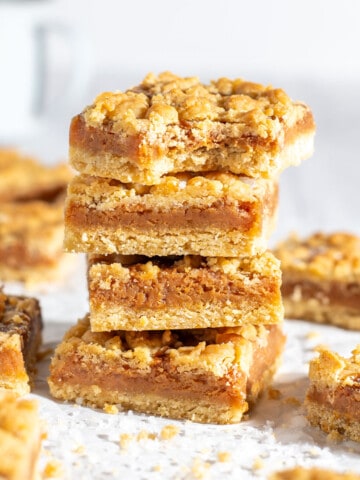
You may also enjoy these no-bake desserts...


Step-by-step instructions

1. Line a 20cm x 20cm (8" x 8") square tin with baking paper, leaving a little overlap to help lift the rocky road out once it's set.

2. Add the condensed milk, chocolate pieces, butter and vanilla extract to a large saucepan.

3. Over medium-low heat, melt the butter and chocolate into the condensed milk, stirring constantly. Be careful not to overheat or boil the chocolate. Once everything is melted and smooth, remove the pan from the heat.
4. Important: Let the chocolate mixture cool for about 5-10 minutes, stirring occasionally. To check if it's cool enough, drop in a piece of marshmallow - if it doesn't melt, the mixture is ready.

5. Add the marshmallows, cookie chunks and chocolate-covered honeycomb (balls or small chunks) to the chocolate mixture. Stir until everything is evenly coated and spread throughout.

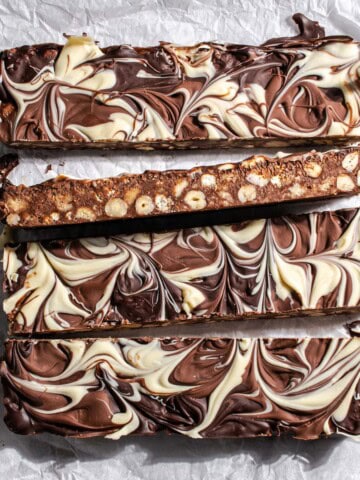
6. Transfer the mixture to the tin, spreading it into the sides and corners, and level the top. Keep it 'rocky' rather than smooth.

7. Optional: Decorate the top with extra marshmallows and honeycomb if you like.
8. Cover the tin with plastic wrap and chill in the fridge for at least 2 hours, or until fully set.
9. Once set, lift the block out of the tin and onto a cutting board. Slice into squares with a large, sharp knife. Tip: For neater slices, dip the knife into boiling water, dry it, and then slice.
Make it in the microwave!
- In a microwave-safe bowl, combine condensed milk, broken chocolate, butter and vanilla.
- Microwave on medium power in 30-second bursts, stirring well between each, until melted and smooth.
- Let cool slightly (about 5 minutes), stirring occasionally.
- Add marshmallows, cookie chunks and chopped honeycomb chunks or balls.
- Mix to combine.
- Transfer to a lined tin, level the top and decorate if desired.
- Refrigerate for at least 2 hours or until set. Slice and enjoy!
Top Tips
Don't overheat the chocolate: When melting the chocolate, avoid overheating or boiling it, as this can result in a grainy texture and a dull appearance.
To prevent this, consider removing the pan from the heat once most of the chocolate has melted.
Then, continue stirring or beating, and the remaining chocolate will melt from the residual heat.
Chop the honeycomb: If you're using big chunks or bars of chocolate-covered honeycomb, be sure to chop it a little smaller before adding it to the mix.
If you're using balls, they can go straight in.
Slicing large marshmallows: Kitchen scissors work wonders to slice them into smaller bits. Keep them a bit chunky - about the size of 2-3 mini marshmallows together.
Here's the trick: After slicing, toss them lightly in some icing sugar to stop them from sticking together (once those moist insides are exposed, they'll stick like nobody's business!).
Don't add too many cookie crumbs: When you add the cookies, try not to throw in too many fine crumbs with the chunks. It keeps the chocolate fudge part smooth and not grainy.
Cool the mixture: Make sure the chocolate mixture is cool enough (but not setting) before adding the add-ins. If it's too hot, your marshmallows will melt - we don't want that!
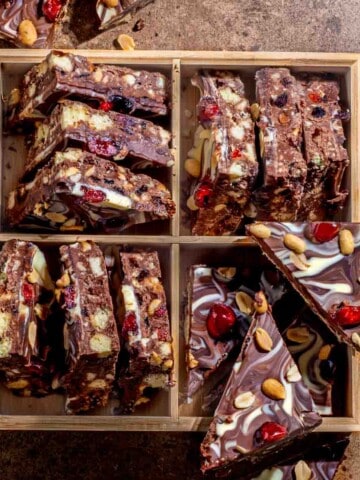
Variations
If you want to veer off this recipe and simply use the chocolate-condensed milk base, here are some alternative options for add-ins:
- Peanuts
- Glazed cherries
- Dried cranberries
- Raisins
- Chopped almonds, hazelnuts or cashews
- Crushed pretzels
- Marshmallow fluff
- Mini caramel bites
- Toffee chunks
- Crushed Digestives or Graham crackers
- Chopped nougat
- Fudge chunks
Storage
Store your rocky road in an airtight container at room temperature for up to a week.
If you need to keep it longer, pop it in the fridge for up to 2 weeks. Just be sure to bring it to room temperature before serving.
You can also freeze it for up to 3 months - just slice it first and layer the pieces with parchment paper to prevent sticking. When ready to enjoy, let it thaw at room temperature for a few hours.
Recipe

Easy Rocky Road Fudge
Equipment
- 1 20cm x 20cm (8" x 8") square tin
Ingredients
- 1 can (14oz/397g) condensed milk
- 400 grams (14oz) milk chocolate, roughly chopped
- 30 grams (1oz) butter - salted or unsalted
- 1 teaspoon vanilla extract
- 110 grams (4oz) marshmallows - cut up large marshmallows or mini marshmallows
- 110 grams (4oz) shortbread fingers, roughly chopped - like Walker's
- 110 grams (4oz) chocolate-covered honeycomb (balls or chunks) - *see blogpost for alternatives in a few countries
Instructions
- Line a 20cm x 20cm (8" x 8") square tin with baking paper, leaving a little overlap to help lift the rocky road out once it's set.
- Add the condensed milk, chocolate pieces, butter and vanilla extract to a large saucepan.1 can (14oz/397g) condensed milk, 400 grams (14oz) milk chocolate, roughly chopped, 30 grams (1oz) butter, 1 teaspoon vanilla extract
- Over medium-low heat, melt the butter and chocolate into the condensed milk, stirring constantly. Be careful not to overheat or boil the chocolate. Once everything is melted and smooth, remove the pan from the heat.
- Important: Let the chocolate mixture cool (but not setting) for about 5-10 minutes, stirring occasionally. To check if it's cool enough, drop in a piece of marshmallow - if it doesn't melt, the mixture is ready.
- Add the marshmallows, shortbread chunks and chocolate-covered honeycomb to the chocolate mixture. Stir until everything is evenly coated and spread throughout.110 grams (4oz) marshmallows, 110 grams (4oz) shortbread fingers, roughly chopped, 110 grams (4oz) chocolate-covered honeycomb (balls or chunks)
- Transfer the mixture to the tin, spreading it into the sides and corners and level the top. Keep it 'rocky' rather than smooth.
- Optional: Decorate the top with extra marshmallows and honeycomb if you like.
- Cover the tin with plastic wrap and chill in the fridge for at least 2 hours, or until fully set.
- Once set, lift the block out of the tin and onto a cutting board. Slice into squares with a large, sharp knife. Tip: For neater slices, dip the knife into boiling water, dry it, and then slice.
Notes
Top Tips
Don't overheat the chocolate: When melting the chocolate, avoid overheating or boiling it, as this can result in a grainy texture and a dull appearance. To prevent this, consider removing the pan from the heat once most of the chocolate has melted. Then, continue stirring or beating, and the remaining chocolate will melt from the residual heat. Chop the honeycomb: If you're using big chunks or bars of chocolate-covered honeycomb, be sure to chop it a little smaller before adding it to the mix. If you're using balls, they can go straight in. Slicing large marshmallows: Kitchen scissors work wonders to slice them into smaller bits. Keep them a bit chunky - about the size of 2-3 mini marshmallows together. Here’s the trick: After slicing, toss them lightly in some icing sugar to stop them from sticking together (once those moist insides are exposed, they’ll stick like nobody's business!). Don't add too many cookie crumbs: When you add the cookies, try not to throw in too many fine crumbs with the chunks. It keeps the chocolate fudge part smooth and not grainy. Cool the mixture: Make sure the chocolate mixture is cool enough (but not setting) before adding the add-ins. If it’s too hot, your marshmallows will melt - we don't want that!
**Nutritional data disclaimer**
Please keep in mind that the nutritional information provided below is calculated by a third party and we cannot guarantee the accuracy. We try our best to give you the most accurate information, but we do not take responsibility for errors that may be present. Also, the nutritional value of the recipe may change depending on the exact brands and products used. We recommend that you consult with a qualified healthcare professional or registered dietitian for personalised advice on your dietary needs.
Nutrition
For food safety advice, including guidance on food allergies


Leave a Reply