
An epicurean adventure to: Great Britain
Most chocolate biscuit cakes lean on rich tea biscuits and a simple ganache topping. This one takes a more indulgent path:
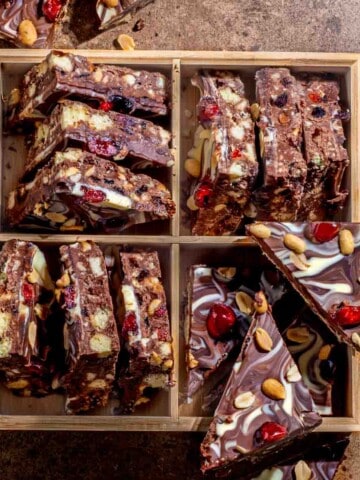
Buttery shortbread fingers, roasted hazelnuts (if you're a Cadbury Whole Nut fan, you'll love this!), the salty snap of chocolate-coated pretzels and a triple-chocolate marble that looks far fancier than it really is.
The method for these crunchy chocolate no-bake bars is blissfully simple: Melt, mix, press, chill.

Jump to:
- Recipe highlights
- You may also like...
- Key ingredient notes and substitutions
- How other cookies compare:
- To roast your own
- Step-by-step instructions
- Top tips for the perfect chocolate biscuit cake
- Variations
- Dietary adaptations
- Doubling the recipe
- Storage and freezing
- Make-ahead & transportation tips
- Presentation ideas
- FAQ
- Recipe
- Top tips for the perfect chocolate biscuit cake
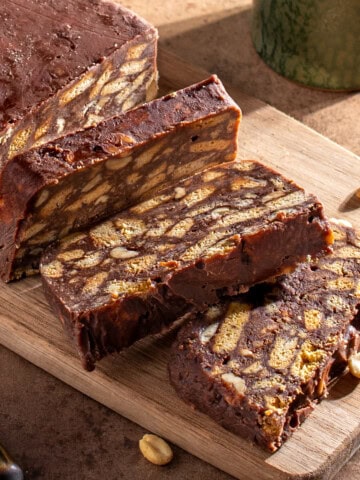
This version was inspired by the royal favourite: A chocolate biscuit cake, supposedly Queen Elizabeth's favourite, that still graces Buckingham Palace tea tables to this day and even appeared at Prince William's wedding!
My take keeps that regal spirit but leans more modern, with chunkier shortbread, a nutty crunch and a marbled topping that feels celebratory and fun.
Around the world, you'll find cousins of this cake: Chocolate tiffin in Scotland, Australia's hedgehog slice, bolo de bolacha in Portugal, Argentina's chocotorta or Sri Lanka's chocolate biscuit pudding.
Each has its own twist, but they all prove the same truth: Biscuits and chocolate are a match made in heaven!
Recipe highlights
- No baking required - all you need is a fridge.
- Luxurious texture - crunchy, chewy, buttery and smooth all at once.
- Visually striking - the marbled topping makes it party-ready.
- Easily adaptable - biscuits, nuts or add-ins can be swapped.
- Royally approved - it doesn't get more British teatime than this!
You may also like...
If you loved this chocolate biscuit cake, you might enjoy a few more no-bake treats that are just as indulgent and fuss-free.
From the rich and chewy rocky road fudge to sweet, sticky date squares, Rice Krispie squares with marshmallow fluff or the classic chocolate tiffin, there's plenty to satisfy your chocolate cravings.
For something a little different, try Tinginys, the Lithuanian no-bake cookie that's charmingly simple but utterly delicious.


Key ingredient notes and substitutions

Shortbread fingers/cookies
You can use round shortbread cookies too, but we like using the fingers because they give chunkier bites and can easily be chopped into small 'squares', adding more texture and buttery, melt-in-the-mouth crunch.
You can also swap them for your favourite plain-ish cookie if you prefer.
How other cookies compare:
- Digestives - less rich, more malty.
- Graham crackers - honeyed and slightly drier.
- Oaty biscuits - wholesome, earthy texture.
Chocolate-covered pretzels
These add a salty snap that balances the sweetness, along with a crunch that's different from the biscuits or nuts.
We like using Flipz, which are widely available in the UK and US, but if you're in a country that doesn't stock them, any brand of chocolate-covered pretzels will do.
And if you'd prefer something a little less sweet, you can always use plain pretzels instead.
Just don't chop them too finely, you want those chunky bits for the best texture.
Golden syrup
We always reach for Lyle's Golden Syrup. It's simply the gold standard for that smooth, buttery caramel flavour. However, a supermarket's own brand will work perfectly too.
If you're in the US, Walmart often stocks Lyle's and some speciality stores carry it too.
No golden syrup? The closest alternative for the same texture and binding power is light corn syrup (like Karo). It won't have quite the same buttery depth, but your bars will still set perfectly.
If you want to mimic that subtle caramel note, you can stir in ½ teaspoon of mild honey or maple syrup along with the corn syrup.
Avoid using straight honey or maple on its own. They're thinner, more strongly flavoured and can make the bars set softer or taste off-balance.
Hazelnuts
We prefer roasted hazelnuts for their deep, toasty flavour. Buy them pre-roasted if you can.
To roast your own
Spread the nuts on a baking tray and bake at 180 °C (350 °F) for 8-10 minutes, shaking the tray halfway. The skins will darken and loosen. You can rub them in a tea towel to remove most skins if you like, but it's not necessary.
There's quite a lot of nuts in this recipe, so make sure it's a nut you really enjoy.
Pecans are also gorgeous here with their buttery sweetness, and macadamias add a rich, creamy crunch.
Step-by-step instructions

1. Line a 20 cm × 20 cm (8″ × 8″) square tin with parchment, leaving a slight overhang for easy lifting later.

2. In a microwave-safe bowl, gently melt the milk chocolate, butter and golden syrup in 30-second bursts, stirring between each. Stop when almost melted and stir until smooth. Overheating can cause the mixture to split.

3. Let it cool for 5-7 minutes so it doesn't melt the chocolate pretzels. In the meantime, get on with the rest.

4. Roughly chop the shortbread fingers, chocolate-covered pretzels and roasted hazelnuts (leave many hazelnuts whole for texture). Don't chop the pretzels too finely, as you want chunky bits for added crunch.

5. Pour the slightly cooled chocolate mixture over the chopped biscuits, pretzels and nuts.

6. Stir gently until everything is evenly coated.

7. Spoon the mixture into the prepared tin. Press it down firmly with the back of a spoon or the base of a glass to remove air gaps and create an even layer (firm compression prevents crumbly slices later).
8. Chill for 1 hour at room temperature, then 30 minutes in the fridge. This gentle set prevents the topping from cracking later.
How to add the chocolate marble
9. Place the milk, dark and white chocolate in three separate microwave-safe bowls. Melt each one individually in 15-20 second bursts, stirring between each burst so the heat distributes evenly.
Stop when there are still a few small lumps and stir until smooth. The residual heat will finish melting them. This prevents scorching and keeps the chocolate silky.
(Alternatively, melt each chocolate in a heatproof bowl set over a pan of barely simmering water, stirring gently.)

10. Remove the tin from the fridge and let it sit at room temperature for about 10 minutes. This prevents the topping from seizing or cracking against a very cold base.
Working quickly, dollop spoonfuls of each melted chocolate randomly over the surface. Gently spread each blob so they all touch (no gaps!), then give the tin a light shake to level.

11. Drag a skewer or toothpick through the blobs in random swirls to create a marbled effect.
Refrigerate for 30 minutes or until firm.

12. Lift out using the parchment overhang. Use a sharp, hot knife (dip in hot water, wipe dry) to slice into neat squares, wiping between cuts to prevent cracks or crumbs.
Top tips for the perfect chocolate biscuit cake
Avoid split chocolate
Use gentle heat only when melting the butter, syrup and chocolate.
Overheating causes the fats to separate, leaving a greasy layer on your bars.
Stop melting when a few lumps remain and then stir until smooth. The residual heat will finish the job.
Let it set at room temperature first
Putting the tin straight into a cold fridge can shock the chocolate-butter mixture, making the fats set unevenly and leaving greasy patches.
Let it firm up at room temperature for an hour, then chill it briefly to finish setting. This gives a smoother, cleaner texture.
Prevent cracks in the topping
If you pour warm melted chocolate onto a rock-hard, fridge-cold base, the sudden temperature difference can make the topping seize or crack.
After chilling, let the base stand at room temp for 5-10 minutes before adding the marble topping.
Stop slices from crumbling
When pressing the mixture into the tin, compress it firmly with the back of a spoon or a glass.
A well-packed base slices neatly and won't fall apart.
Get bakery-worthy cuts
Use a large, sharp knife, dipped in hot water and wiped dry between cuts. Slice straight down (don't saw) for crisp, professional-looking squares.
Variations
- Citrus peel - Candied orange or lemon peel adds a festive flair.
- Dried fruit - Cranberries, raisins or chopped apricots for chew.
- Festive spices - A pinch of cinnamon, nutmeg or ginger in the base.
- Boozy version - Add 2 tablespoon Baileys, rum or brandy to the melted mix.
- Kid-friendly - Swap nuts for mini marshmallows or candy-coated chocolates.
- Luxury twist - Drizzle caramel or sprinkle sea salt flakes over the topping.
Dietary adaptations
Gluten-free: Use gluten-free shortbread or oat biscuits in place of regular biscuits. If the gluten-free biscuits seem very dry or crumbly, add an extra tablespoon of golden syrup to help everything stick together.
Nut-free: Replace the hazelnuts with more pretzels (you can use a mixture of plain or chocolate-coated, pumpkin seeds, or simply add more biscuits instead of nuts.
Dairy-free: Use a block-style plant-based butter (not a spread) along with 70% or higher dark chocolate for both the base and the topping. Be mindful of the water content in plant-based butters, if it's too high, the mixture can seize.
Doubling the recipe
If you double the quantity but want your bars to stay the same thickness as a 20 cm × 20 cm (8 in × 8 in) pan, you'll need a pan with roughly double the surface area, so about 800 cm² (124 in²).
Good pan options:
- 28 cm × 28 cm (11 in × 11 in) - slightly under but perfectly fine.
- 22 cm × 36 cm (8.5 in × 14 in) - very close in area.
- 23 cm × 35 cm (9 in × 13.75 in) - just over, also works well.
Tip: Avoid using a tin that's too small. Your bars will be thicker and take much longer to set.
Storage and freezing
Storage
Store the bars in an airtight container in a cool, dry cupboard, where they will keep for 5-7 days.
Only refrigerate them if it is very warm, as the fridge can cause the chocolate to bloom or absorb other food smells.
If you do chill the bars, place baking paper between layers and bring them to room temperature before serving.
Freezing
Wrap each square individually in baking paper or cling film, then place them in a freezer-safe bag or container.
They can be frozen for up to 2 months. Defrost the bars unwrapped at room temperature for about 30 minutes before serving.

Make-ahead & transportation tips
Make-ahead
This cake is best made 1-2 days before serving, as the flavours meld and the texture becomes more cohesive.
Transport
If your bars are already cut into squares, place them in a rigid, airtight container with layers separated by baking paper to prevent sticking.
Keep them cool during transport. An insulated bag or cooler works well if it's warm. Avoid stacking too high to prevent squashing.
Presentation ideas
For parties or tea tables...
- Arrange the squares neatly on a platter.
- Use a tiered cake stand.
- Stack them in small towers.
- Place each square in a mini paper case or gift box for a polished, individual-serving look.
FAQ
Absolutely! A simple chocolate ganache is the classic choice.
Pour it over the set base and let it firm up. It won't have the marble's textural contrast or wow factor, but it's smooth, glossy and delicious.
Try adding a splash of liqueur to the base. Baileys, Cointreau or dark rum all work beautifully.
A light sprinkle of sea salt on top also adds a grown-up twist and balances the sweetness.
Yes! You can swap in any plain-ish biscuit you love.
Round shortbreads or chopped digestives give a slightly different bite, but the cake will still hold together beautifully.
Place the squares in a rigid container with layers separated by baking paper, and lay a loose sheet of baking paper over the top to protect the marble.
Keep cool while travelling, and avoid stacking too high to prevent smudging.
Yes! It actually improves with a little rest.
Make it 1-2 days in advance and the flavours will meld while the texture firms up nicely.
Recipe

Marbled Chocolate Biscuit Cake
Equipment
- 8" x 8" (20cm x 20cm) square baking tin
Ingredients
For the biscuit cake base
- 225 grams (7.9 oz) milk chocolate
- 125 grams (4.4 oz) butter - salted or unsalted
- 125 grams (4.4 oz) golden syrup
- 300 grams (10.6 oz) shortbread fingers - or other cookies of choice like graham crackers/digestives/oaty cookies
- 90 grams (3.2 oz) chocolate-covered pretzels - Like 'Flipz'
- 150 grams (5.3 oz) hazelnuts, roasted
For the marbled topping
- 80 grams (2.8 oz) milk chocolate
- 80 grams (2.8 oz) dark chocolate
- 80 grams (2.8 oz) white chocolate
Instructions
Make the cake base
- Line a 20 cm × 20 cm (8″ × 8″) square tin with parchment paper, leaving a slight overhang for easy lifting later.
- In a microwave-safe bowl, gently melt the milk chocolate, butter and golden syrup in 30-second bursts, stirring between each. Stop when almost melted and stir until smooth. Overheating can cause the mixture to split.225 grams (7.9 oz) milk chocolate, 125 grams (4.4 oz) butter, 125 grams (4.4 oz) golden syrup
- Let it cool for 5-7 minutes so it doesn't melt the chocolate pretzels. In the meantime, get on with the rest.
- Roughly chop the shortbread fingers, chocolate-covered pretzels and roasted hazelnuts (leave many hazelnuts whole for texture). Don't chop the pretzels too finely, as you want chunky bits for added crunch.300 grams (10.6 oz) shortbread fingers , 90 grams (3.2 oz) chocolate-covered pretzels, 150 grams (5.3 oz) hazelnuts, roasted
- Pour the slightly cooled chocolate mixture over the chopped biscuits, pretzels and nuts.
- Stir gently until everything is evenly coated.
- Spoon the mixture into the prepared tin. Press it down firmly with the back of a spoon or the base of a glass to remove air gaps and create an even layer (firm compression prevents crumbly slices later).
- Chill for 1 hour at room temperature, then 30 minutes in the fridge. This gentle set prevents the topping from cracking later.
Add the marbled topping
- Place the milk, dark and white chocolate in three separate microwave-safe bowls. Melt each one individually in 15–20 second bursts, stirring between each burst so the heat distributes evenly.Stop when there are still a few small lumps and stir until smooth. The residual heat will finish melting them. This prevents scorching and keeps the chocolate silky.(Alternatively, melt each chocolate in a heatproof bowl set over a pan of barely simmering water, stirring gently.)80 grams (2.8 oz) milk chocolate, 80 grams (2.8 oz) dark chocolate, 80 grams (2.8 oz) white chocolate
- Remove the tin from the fridge and let it sit at room temperature for about 10 minutes. This prevents the topping from seizing or cracking against a very cold base. Working quickly, dollop spoonfuls of each melted chocolate randomly over the surface. Gently spread each blob so they all touch (no gaps!), then give the tin a light shake to level.
- Drag a skewer or toothpick through the blobs in random swirls to create a marbled effect.Refrigerate for 30 minutes or until firm.
- Lift out using the parchment overhang. Use a sharp, hot knife (dip in hot water, wipe dry) to slice into neat squares, wiping between cuts to prevent cracks or crumbs.
Notes
Top tips for the perfect chocolate biscuit cake
Avoid split chocolate
Use gentle heat only when melting the butter, syrup and chocolate. Overheating causes the fats to separate, leaving a greasy layer on your bars. Stop melting when a few lumps remain and then stir until smooth. The residual heat will finish the job.Let it set at room temperature first
Putting the tin straight into a cold fridge can shock the chocolate-butter mixture, making the fats set unevenly and leaving greasy patches. Let it firm up at room temperature for an hour, then chill it briefly to finish setting. This gives a smoother, cleaner texture.Prevent cracks in the topping
If you pour warm melted chocolate onto a rock-hard, fridge-cold base, the sudden temperature difference can make the topping seize or crack. After chilling, let the base stand at room temp for 5–10 minutes before adding the marble topping.Stop slices from crumbling
When pressing the mixture into the tin, compress it firmly with the back of a spoon or a glass. A well-packed base slices neatly and won’t fall apart.Get bakery-worthy cuts
Use a large, sharp knife, dipped in hot water and wiped dry between cuts. Slice straight down (don’t saw) for crisp, professional-looking squares.
**Nutritional data disclaimer**
Please keep in mind that the nutritional information provided below is calculated by a third party and we cannot guarantee the accuracy. We try our best to give you the most accurate information, but we do not take responsibility for errors that may be present. Also, the nutritional value of the recipe may change depending on the exact brands and products used. We recommend that you consult with a qualified healthcare professional or registered dietitian for personalised advice on your dietary needs.
Nutrition
For food safety advice, including guidance on food allergies


Leave a Reply