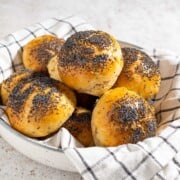
Rundstykker - Danish breakfast rolls
Rundstykker, the beloved Danish breakfast roll isn't just any old pastry - it's a cultural icon! These tasty little buns are a staple in Denmark's breakfast scene. Whether you slather them in butter or layer on some cheese and jam, Rundstykker is the perfect pick-me-up for any time of day, not just breakfast.
Print Recipe
Save
Servings: 10 rolls
Calories: 211kcal
Equipment
- 1 stand mixer with dough hook attachment
- 1 large baking tray
Ingredients
- 300 millilitres warm milk
- 1½ teaspoon active dried yeast - 7.5ml. Make sure the yeast is still fresh and within date.
- 1½ teaspoon sugar
- 400 grams all purpose flour - and extra for handling the dough
- 1 teaspoon salt
- 30 grams unsalted butter - melted
- 1 egg - lightly beaten for brushing
- 3-4 tablespoons poppy seeds - for sprinkling
Instructions
- Line a large baking tray with parchment paper.
- In a bowl, add the warm milk, yeast and sugar. Give it a quick stir. Note: The milk should not be boiling, just warm, slightly above room temperature. We heat ours in the microwave for about 1 minute in a tall measuring jug.300 millilitres warm milk, 1½ teaspoon active dried yeast, 1½ teaspoon sugar
- Leave the yeast mixture to develop for 10-15 minutes. Note: You can tell that a yeast mixture has developed when it becomes frothy and bubbly on the surface. This indicates that the yeast is active and has started to feed on the sugar in the mixture, producing carbon dioxide gas as a by-product.
- In the meantime, add the flour and salt to the bowl of a stand mixer. Give it a stir to combine.400 grams all purpose flour, 1 teaspoon salt
- Add the melted butter.30 grams unsalted butter
- Once the yeast is ready, add the yeast mixture and give the dough a quick stir with a fork.
- Using the dough hook on the stand mixer, knead for 10-12 minutes.At first the dough will look very sticky. After kneading, it will look much more uniform, smooth and elastic.
- Transfer the dough into a large, lightly oiled mixing bowl. Cover with a kitchen towel and allow it to rise in a warm spot for 60-90 minutes until it's doubled in volume. Tip: During the winter in the UK we like to put the oven on a low heat for about 5 minutes to heat up. Switch the oven off and put the dough inside with the door slightly ajar. It's important that the oven is not at all hot, but just warm.
- When the dough has risen, cover your hands in flour and divide it into 10 equally sized pieces. Roll each piece into a ball and place on a parchment lined baking tray. Allow enough space between each roll to allow for rising.
- Cover the tray loosely with a clean kitchen towel and allow to rest for a further 30 minutes in a warm spot.
- Preheat the oven to 200℃/390℉/gas mark 6.
- When the dough has rested, brush the rolls with the lightly beaten egg and a pastry brush.1 egg
- Sprinkle over the poppy seeds. With the tip of a very sharp knife, or a scalpel, cut a small cross in the top of each roll.3-4 tablespoons poppy seeds
- Bake for 20-25 minutes until the rolls are golden brown, well risen and baked through. Allow to cool for 5 minutes before transferring to a cooling rack.
Notes
- Use good-quality ingredients, especially flour and yeast, to ensure the best results.
- Follow the recipe measurements and instructions carefully. Use digital kitchen scales to weigh out the ingredients.
- Knead the dough well to activate the gluten, which will help the bread rise and give it a chewy texture.
- Allow enough time for the dough to rise and rest, as this is essential for developing the flavour and texture of the bread.
- This is a medium soft dough, so it really helps immensely to keep some flour on hand when you start shaping the dough balls. Stick your fingers in the flour before breaking pieces off.
- Use a sharp knife, scalpel or scissors to make the cuts on the top of the bread before baking, as this will help the bread rise and give it its characteristic look.
- Bake the bread in a preheated oven at the right temperature and for the right amount of time to achieve a crispy crust and a soft, fluffy interior.
- Let the bread cool for a few minutes before serving, as this will help it to set and retain its shape.
**Nutritional data disclaimer**
Please keep in mind that the nutritional information provided below is calculated by a third party and we cannot guarantee the accuracy. We try our best to give you the most accurate information, but we do not take responsibility for errors that may be present. Also, the nutritional value of the recipe may change depending on the exact brands and products used. We recommend that you consult with a qualified healthcare professional or registered dietitian for personalised advice on your dietary needs.
Nutrition
Calories: 211kcal | Carbohydrates: 35g | Protein: 8g | Fat: 5g | Saturated Fat: 1g | Polyunsaturated Fat: 1g | Monounsaturated Fat: 1g | Trans Fat: 0.002g | Cholesterol: 20mg | Sodium: 257mg | Potassium: 149mg | Fiber: 2g | Sugar: 3g | Vitamin A: 74IU | Vitamin C: 0.03mg | Calcium: 88mg | Iron: 2mg